Strawberry Glazed Spring Sugar Cookies: Sunshine Bites
I’m not going to pretend these cookies aren’t delicious. Strawberry Glazed Spring Sugar Cookies are basically sunshine you can eat. They’re bright, a little tart, and somehow magically coaxed into a perfect bite every time. Ready to bake happiness?
Why Strawberry Glazed Spring Sugar Cookies Hit Different
Spring is basically the opening act for fruit-forward desserts, and these cookies are the headliner. Fresh strawberry flavor meets a soft sugar cookie base, then a glossy glaze that gleams like morning dew. They’re simple enough for a weekday bake, but special enough for a weekend brunch or gift-worthy cheer. FYI, the color alone will make you say “aww” before you even bite.
The Basics: What You’ll Need
Let’s lay it out so you don’t spelunk the pantry mid-recipe.
- Butter, sugar, eggs, vanilla – the classic sugar-cookie squad
- Fresh or freeze-dried strawberries for the flavor boost
- Flour, a pinch of salt, baking powder
- Powdered sugar, strawberry juice or puree, a splash of milk for the glaze
Pro tip: If you don’t have strawberry puree, a quick mash of fresh berries works, but you’ll want to strain out the seeds or you’ll get speckled glaze. Nobody wants berry confetti on their cookies, right?
rolling vs. chilling: the dough dance
Making sugar cookies isn’t just “shake and bake.” The dough needs a moment in chill-town to keep those edges sharp and tidy.
- Cream butter and sugar until fluffy. This is what gives you that tender, melt-in-your-mouth bite.
- Beat in eggs and vanilla. Don’t rush this; air is your friend here.
- Stir in dry ingredients plus finely chopped strawberries or strawberry powder for flavor.
- Wrap and chill. At least 30 minutes, ideally an hour. This is where the dough gets calm and firm.
Chill check: how cold is cold enough?
If your dough tears or sticks too much, it’s not the end of the world—just give it another 15 minutes in the fridge. The goal is firm enough to roll, not rock-hard like a hockey puck.
Shaping with Style
Shape the cookies into friendly, shareable forms. Hearts, stars, or little round discs — your call.
- Roll to about 1/4 inch thickness for a crisp edge with a soft center.
- Cut shapes with a sharp cookie cutter; press firmly so edges stay clean.
- Re-roll scraps once, if needed. Don’t overwork the dough or you’ll get tough cookies. No one wants a chew that feels rebellious.
Tip: keep it cute and consistent
Use parchment or a silicone mat to prevent sticking, and chill cutouts for 15 minutes before baking if your dough looks a touch soft. Uniform shapes bake evenly and simplify glazing later.
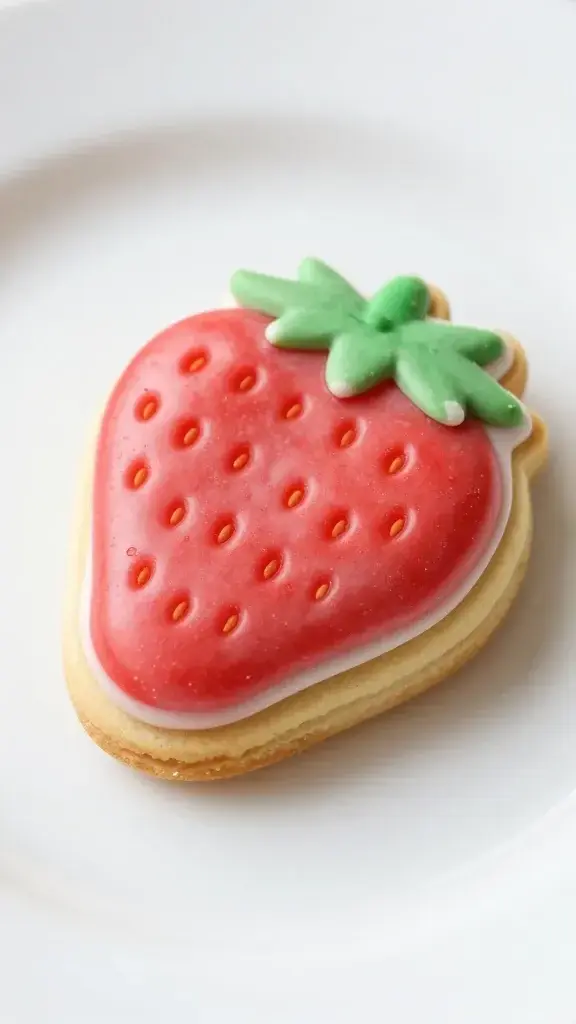
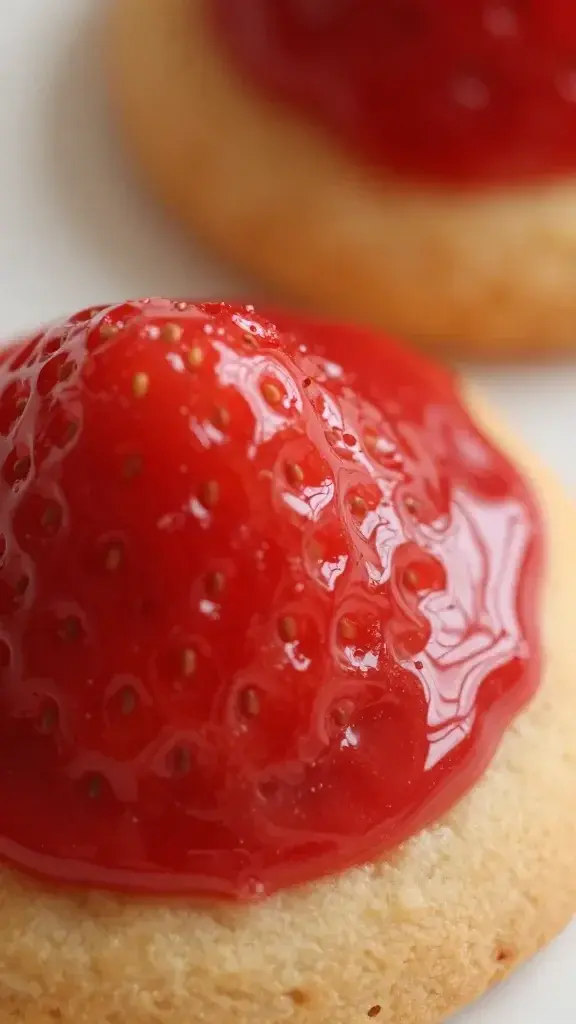
The Glaze Game: Strawberry Shine
This is where the sparkle happens. A glossy strawberry glaze elevates bland to brilliant.
- Mix powdered sugar with fresh strawberry juice or puree. Start with a little liquid and add as needed.
- A splash of vanilla or a drop of lemon juice can brighten the glaze.
- Dip or brush on the cooled cookies for a shiny finish. Let them set to avoid smudges.
Consistency matters: glaze a little or glaze a lot
– Thick glaze = deeper color and a barista-level shine.
– Thinner glaze = a delicate wash that lets cookie flavor shine through.
If your glaze looks cloudy, add a pinch more powdered sugar and a tiny bit of water or juice to adjust.
Flavor Escapes: Strawberry Intensity
Strawberry flavor can swing from super mild to almost jammy. You get to pick your preference.
- Fresh berries give a bright, tart note. Mash and strain if you want a clean glaze.
- Freeze-dried strawberries bring a concentrated punch without extra moisture. Great for dough and glaze color.
- A touch of lemon zest in the glaze can lift the berry flavor and prevent everything from tasting too sweet.
Flavor pairings worth a try
– Almond or pistachio in the cookie base for a nutty companion to strawberry.
– White chocolate drizzle on top for a luxe finish.
– Tiny citrus zest in the glaze to keep things lively. FYI, balance is key—don’t overdo it.
Decorating Do’s and Don’ts
Decorating is part art, part fun, and part “how fast can I finish this before the frosting melts.”
- Let the glaze set briefly before adding toppings like sprinkles or edible glitter.
- Keep decorations light if you want to taste the cookie, not just the sugar glaze.
- Use edible markers or food-safe pens for cute details on dried glaze.
Texture tricks
If you want a bit more bite, add a touch more flour to the dough at the rolling stage or bake a minute longer. If you want fluffier centers, take them out a touch sooner. It’s both science and art, and you own the canvas.
Storage and Serving: Make-Ahead Magic
These cookies travel well and stay tasty for a bit, which makes them perfect for parties or gifts.
- Store baked cookies in an airtight container at room temp for up to 3 days.
- Glazed cookies last longer but store separately from the glaze if you’re making ahead.
- Freeze both dough and baked cookies for longer-term plans. Defrost at room temp and re-glaze if needed for that fresh pop.
When to bake vs. when to freeze
If you’ve got a bunch of strawberry cravings but limited time, bake the cookies ahead of time, freeze, and thaw with fresh glaze later. Your future self will thank you with a big grin.
FAQ
Q: Can I make these gluten-free?
A: Yes, you can swap the all-purpose flour for a gluten-free blend that behaves like regular flour in cookies. Just keep an eye on the hydration—the dough might need a touch more (or less) liquid. FYI, texture may differ slightly, but the strawberry glow will still shine.
Q: Can I use frozen strawberries?
A: You can. Thaw and pat them dry before mixing to avoid soggy dough. If you want a stronger strawberry punch, try freeze-dried strawberries in the dough and glaze.
Q: My glaze looks thick and clumpy. What now?
A: Warm it slightly over a low heat or in short bursts in the microwave, stirring until smooth. Add a tiny bit of milk or juice until you reach the desired drizzle consistency. Don’t over-thin, or you’ll get a runny mess.
Q: Do I need to chill the dough?
A: Yes, chilling helps the cookies hold their shape and prevents spreading. If you’re in a rush, at least 20–30 minutes in the fridge helps a lot.
Q: Can I color the glaze?
A: Absolutely. A few drops of red gel color in the glaze will intensify the strawberry vibe without watering it down. Just don’t overdo it—keep it charming and not neon.
Q: Any tips for gifting these?
A: Stack the cookies with parchment between layers in a tin or box. Add a small sachet of powdered sugar for a little gift sparkle. Tie with a ribbon and a note: “Strawberry sunshine inside.”
Conclusion
There you have it—Strawberry Glazed Spring Sugar Cookies in all their sunshiny glory. They’re approachable enough for a weeknight but pretty enough to set on the table for guests, with that glossy glaze doing the talking. IMO, they’re the kind of treat that makes you smile before you even bite.
If you’re feeling bold, experiment with toppings and color accents. The cookies themselves taste like spring, but the real magic is in how you serve them: with a friend, a laugh, and maybe a dubious but enthusiastic cat who clearly wants one too. Happy baking, and may your glaze shine as bright as your mood.